Last Updated on February 3, 2026
Your eyes are the key to the sparkling, healthy you. This article gives you some easy makeup techniques to make your eyes pop and create stunning eyeshadow looks with the right tools!
Makeup trends are ever-changing, and that means more fun! You may have heard of the cat eye makeup trend by this point in your makeup life. This trend became popular because it elongated the eye and made the eyes a true focal point. This trend also became popular with eyeglass wearers because the effect could be seen even when wearing glasses.
Additionally, cat eye looks can be worn with any eye shape, which is a win for everyone! It’s no secret that celebrities and social media platforms help curate trends of all kinds, including makeup. So, it’s no surprise we have Kim Kardashian and TikTok to thank for the newest reverse cat eye trend!
With so many different types of eye makeup brushes available, it can be difficult to know which one to choose. In this article, we will break down the different types of eye makeup brushes, their uses, and how to choose the right one for your needs.
Types of Eye Makeup Brushes

When it comes to applying eye makeup, choosing the right brush can make all the difference as well. The right brush can help you achieve a flawless and professional look, while the wrong brush can leave you with a messy and uneven application.
First thing first, let’s talk about the tools you need to create any stunning eye makeup look. There are several different types of eye makeup brushes, each designed for a specific purpose. The most common types of eye makeup brushes include:
- Eyeshadow Brushes
- Blending Brushes
- Angled Brushes
- Smudger Brushes
- Flat Brushes
- Lash and Brow Brushes
Each of these brushes serves a specific purpose, and having the right brush for the right job can make all the difference. Let’s take a closer look at each type of brush.
Eyeshadow Looks Brushes
Eyeshadow brushes are the most basic and essential type of eye makeup brush. They come in a variety of shapes and sizes and are used to apply eyeshadow to the eyelid. The most common shape for an eyeshadow brush is a flat, dense brush with a slightly rounded edge. This type of brush is perfect for packing on color and creating a bold, defined look.
Blending Brushes
Blending brushes are used to soften and blur the edges of eyeshadow, creating a seamless and natural look. They are typically fluffier and more tapered than eyeshadow brushes and come in a variety of shapes and sizes. The most common shape for a blending brush is a tapered, dome-shaped brush. This type of brush is perfect for blending out the crease and outer corner of the eye.
Angled Brushes
Angled brushes are similar to blending brushes, but they have a more defined angle to the bristles. They are commonly used to create a defined crease or to apply eyeshadow as a liner. The most common shape for an angled brush is a flat brush with an angled edge. This type of brush is perfect for creating a defined crease or for using eyeshadow as a liner.
Smudger Brushes
Smudger brushes are small, dense brushes that are used to smudge and blend eyeliner. They are typically short and stubby and have a slightly rounded edge. This type of brush is perfect for creating a smoky, dramatic look or for blending out harsh lines created by eyeliner.
Flat Brushes
Flat brushes are typically small and flat, with a slightly rounded edge. They are used to apply concealer or color corrector to the under-eye area. They are also great for applying cream eyeshadow or for pressing glitter onto the lid.
Lash and Brow Brushes
Lash and brow brushes are small, precise brushes that are used to groom and shape lashes and brows. They come in a variety of shapes, including spoolie brushes, angled brushes, and comb brushes. This type of brush is perfect for separating lashes, taming unruly brows, or defining and shaping brows.
Choosing the Right Eye Makeup Brush
When it comes to applying eye makeup, having the right brushes can make a big difference. Here are some common eye makeup brushes and their uses:
- Flat Brush: This brush is best for packing on eyeshadow on the lid.
- Crease Brush: This brush has a tapered end and is ideal for blending eyeshadow in the crease of your eye.
- Blending Brush: This brush is fluffy and is great for softening harsh lines and blending eyeshadows.
- Angled Brush: This brush has a slanted tip and is perfect for applying eyeliner or filling in eyebrows.
- Detail Brush: This brush is small and precise, making it perfect for applying shadow in the inner corner of the eye or for creating a smoky effect.
Makeup Techniques, Hacks, and Inspo
Before you start creating stunning eye looks, here are 6 easy makeup techniques that are good to have in mind at the time of doing your eye makeup.
Mascara
Wearing Lilac St, Mac, or Vavalash eyelash extensions is the surest way to make your eyes pop, and if you wear mascara on eyelash extensions, it further enhances it. However, applying mascara on eyelash extensions is different from applying it to natural ones. You must be careful because doing it wrongly can damage them. Here is how you need to do it.
Clean your lashes and comb them in their place. Gently apply mascara to your lashes, and make sure you start applying it from the middle before going to the tips. Never apply mascara where the lash meets your skin. Always stick to the tips only. Avoid adding two coats.
In case you are not a fan of eyelash extensions, we suggest adding two coats to truly get them to stand out, and make sure to coat the back of your eyelashes as well, this is truly a game changer. It is also important to concentrate the mascara on the lashes on your outer corner to give a lifted effect.
Eyeliner
If you have small eyes, you can accentuate them using a metallic liner and use them on the top only. Deep-set and hooded eyes can be accentuated with thick eyeliner application at the outer ridges. In these scenarios, using eyeliner can make your eyes perk up.
Reverse the look of tired eyes using this eyeliner technique. Rim the eye waterline using a matte eyeliner that closely resembles your skin color. It will make your eyes look bigger and brighter instantly. Make sure the color is flesh-toned and not black. This single-swipe technique can fake a good night’s rest.
Highlighter
A tiny amount of highlighter put in the right place can open the area around your eyes. Use a shade lighter than your skin tone and draw a line under your brow area to bluff it up. This can make that area perk up, make it seem bigger, and draw attention to the area.
If it is a dressy occasion and you had a restless sleep the previous night, add shimmer to your inner eye area along the brow line. Choose a tone that glows brightly in the light. That should leave your eyes looking doe-eyed and fresh.
Eyeshadow
Finding palettes and eyeshadow looks to compliment the color and shape of your eyes is always a challenge. But when you find the right color, use that eye shadow to accentuate your eyes. The way to do it is by finding a color wheel to choose a shade that is opposite to the color of your eyes. That way, you make your eyes stand out.
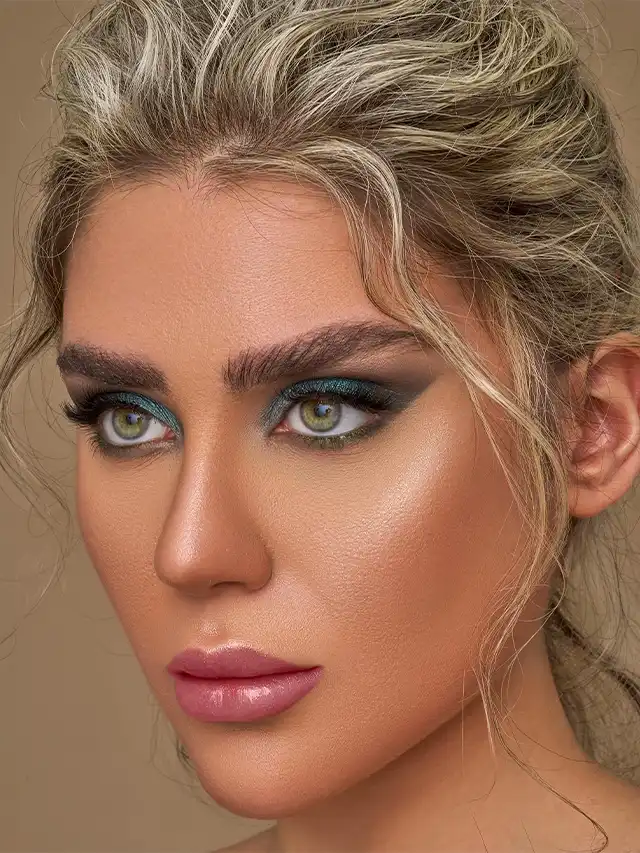
For instance, choose a brown shade eyeshadow if you have blue eyes. Similarly, brown eyes would look great with teal or blue shadow, and green eyes would pop out with aubergine shades. Play around until you get the right shade that goes with your eye color.
Eyebrows
Defined eyebrows can frame your face, perking up your eyes and making them look attractive and less tired. A properly filled-in brows with a shadow that matches it is a highly recommended tip to pop your eyes. Using short strokes, brush the hairs towards either side of the tail, following the brow arch.
For women who have strong brows, we suggest using a brow gel so that it sets once they are filled in. Try soap brows to see whether that is giving you a feel-good factor. Use a primer base just under the eyebrows to even the crease on your eyelids. This will also smoothen the eyelids.
Concealer
The dark circles around your eyes can make your skin look dreary and dull. Moreover, your eyes look smaller than they normally are with those circles. Even up and crease out the circles using a concealer of a shade a few notches below your skin tone. Hit the concealer on those bags, and it can work double duty.
Concealer is every woman’s savior when it comes to covering and brightening those purple baggy tones into a seamless blend. A good concealer illuminates the eyes, feels weightless, and gives you complete coverage. Pick a warm, peachy tone and a shade lighter than your natural tone.
Create a Reverse Cat Eye
What is the reverse cat eye? Instead of lining the top lid and flicking the line out, you line the bottom lash line and flick up and out. What are some things you may want to keep in mind when doing the reverse cat eye?
Step 1: Apply Eye Primer
Before any primer is used, invest in a heavy-duty moisturizer. The skin around the eyes becomes thinner as we age, and it needs more care. Spraying some rose water will help absorb any moisture you add. Once the rose water is dry, then add your serums. Once those are dry, add your moisturizer. Do not apply any primer until your eye area is dry from the steps mentioned before. Then, apply eye primer, especially underneath the eye. You want the makeup up to glide on and stick to where you put it.
Step 2: Highlight Your Crease
Highlight your crease. This highlight allows the balance between the lower lash line and eyelid to work together to create a fierce look.
Step 3: Apply Eyeshadow to the Lower Lash Line
Apply eyeshadow to the lower lash line with a flat brush and make sure to create a winged look at the outer corner of the eyes. A great tip is to place eye-safe tape in the area as a guideline for a more precise and sharp line. If you want a more intense look, you can combine two different eyeshadows for a gradient effect.
Step 4: Line Lower Water Line
Once you’re done layering the eyeshadow, go ahead and line the lower water line with a nice dark color of eyeliner. This adds more precision to your work and finishes the look. After that, go ahead and add mascara and even false lashes for a full-blown dramatic effect.
Step 5: Intensify the Shade
Now you’re going to want to intensify the shade. The traditional reverse cat eye is very dark and sultry, so play around with black eye shadows. Be sure to tap off the excess to minimize as much fallout as possible. This step is going to take the most amount of time because you are going to focus on layering the color. You want to stick as close to the lash line as possible. This may be an opportunity even to wet a thin angle brush to help with the color intensity and precision. Another tip would be to add a darker color to the corners of your eyes.
Step 6: Lower Water Line Eyeshadow
Once you’re done layering the eyeshadow, go ahead and line the lower water line with a nice dark color of eyeliner. This adds more precision to your work and finishes the look. After that go ahead and add mascara and even false lashes for a full-blown dramatic effect.
Additional Tips for the Reverse Cat Eye Look
Not All Black Eye Shadows are Made the Same
Now, the above tips are the basics for achieving the cat eye, which means it’s going to take practice, and you’ll quickly realize not all black eye shadows are made the same. If you have a black eyeshadow that starts as a barely there gray, well then you’re going to be taking a lot longer to achieve that look you want for this bold type of eyeshadow looks. Additionally, you don’t even have to use black as your base. This look can be done in varying shades of green, pink, or even rainbow! Makeup is supposed to be fun and experimental! All we’re doing here is learning how the reverse cat eye works, so you can dominate it later.
Add Shade Lighter Than Your Skin to Add Depth
Some people feel a little naked without anything on their top lash line or lid. To combat this, I suggest using a shade a bit lighter than your natural skin tone to add some depth and make you feel less naked. Maybe you want to throw a shimmer on there too to add some pop, which is all great! Remember, makeup doesn’t have these firm rules, just loose guidelines to help you achieve the desired look you want.
Define Your Eye Shape
Another factor you may want to consider is how big your eyes are and where they reside on your face. If your eyes are closer together, then maybe instead of lining them with a dark eyeshadow, you place a little light shimmer in the corner of your eyes instead. Some of you may not want dark colors sitting underneath your eyes, so in that case, use varying shades of neutrals to achieve the reverse cat eye look.
What is Your Eye Shape?
Eye shapes are also going to dictate how this trend looks on you, which means you’re going to figure out your eyes. This will also be a guide to which eyeshadow looks to enhance your eye features better. Now, you may already know your eye shape and that’s fabulous, but sometimes understanding what compliments your eye is a different story. Any makeup trend can be worn by anyone because makeup is fluid and adaptable. Here are some tips to create a fabulous reverse cat eye for various eye shapes and skin textures!
Close Set Eyes
To enhance this eye shape, wear some light colors in the corner of your eye and maybe even use a white liner instead of a harsh black liner. There’s also an opportunity here to create a gradient liner with black, gray, and white to enhance the reverse cat eye look while opening up the eye.
Wide Set Eyes
Darker inner corner shadows and liners will create a more balanced eye here.
Hooded Eyes
Focus on creating clean lines for the reverse cat eye and be sure to use shadows closer to your skin tone above the top lash line. This will create depth and help blend the overall look. The lower lash line should also have less of a smudged look because too much darkness will smush the eyes together.
Monolids
For this eyeshadow look, try to use similar shades to create depth in the crease, and be mindful of how much product you use. The colors can vary, but be mindful that your reverse cat eye may be a little thinner to not overwhelm the eye.
Upturned Eyes
Keep the liner focused on the waterline, as this will enhance the eye shade without shrinking it.
Almond Eyes
Pop a deeper shade in your crease to create dimension and blend out to a V shape. This will help make the eye look to blend without looking so disjointed.
Conclusion
For all eyeshadow looks, it is important to take to consider eye makeup brushes, and it is key to consider the bristles. Synthetic brushes are great for cream products, while natural hair brushes are best for powder products. Additionally, look for brushes with soft, densely packed bristles for a smooth and even application. Also, consider your eye shape and eye color. Some people may even use complementary colors for their reverse cat eye. For example, blue eyes shine with darker browns and gold for their smokey looks. Green eyes take a shine to colors in the purple family, and brown eyes are the most versatile.
Ultimately, makeup is whatever you want it to be, and you can do whatever you want. Once you’ve selected the style that works best for you, party on and take the world with confidence!
No post found!
Which brushes are best for eye makeup?
Miniature Eyeshadow Brush
Little eye-detailed brushes are the best and most essential eye makeup tools, according to Daoud. According to her, a little shadow brush, often referred to as a smudger brush, can be used to define the margins of your eyes, add a highlighter to the inner corners of your eyes, or smoke out the lower lash line with eyeshadow.
What face shape is best for cat eye makeup?
The oval face is the face shape that highlights a cat’s eye makeup the best.
How to do simple eye makeup for beginners?
Apply an eye primer as the first step. Step 2: Choose neutral colors. Step 3: Choose your blending equipment. Using the eye shadow brush in step four. Using the blending brush in step five. Contour your eyes in step six. Step 7: It’s time to highlight the bottom lash line with color. Include a wing as a final touch.
Disclaimer: This post contains affiliate links. If you buy an item through one of those affiliate links, Successible Life may get a small commission at no extra cost to you. This helps keep the blog running so we can continue to provide you with the best content.

Meet Kourtney, a writer specializing in sex and relationships. Known for her honest and insightful approach, she explores themes of intimacy and personal growth. Her work combines personal anecdotes, expert opinions, and practical advice, helping readers navigate the complexities of modern relationships and embrace their desires. Kourtney's writing serves as a guide for those seeking authentic and fulfilling connections.