Last Updated on May 26, 2025
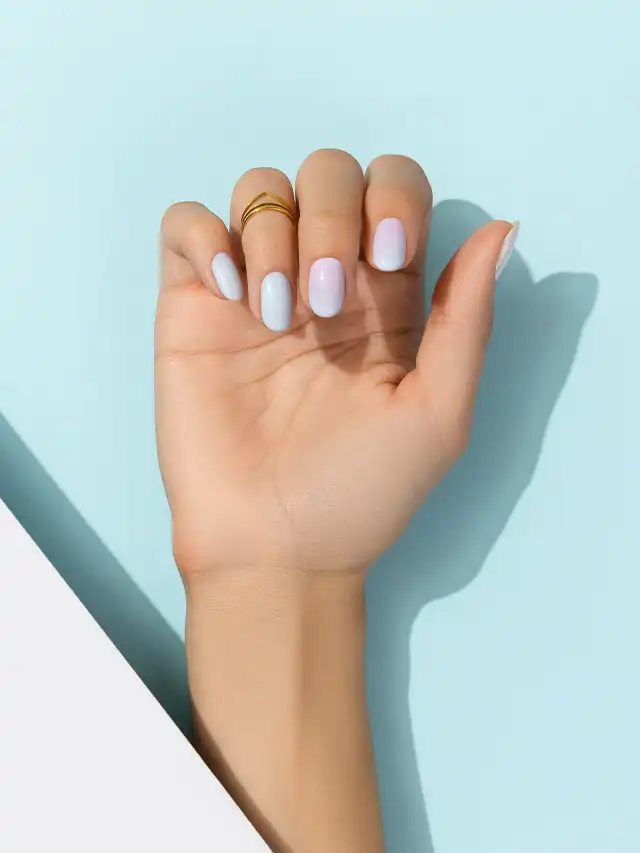
Ombre nail design creates a beautiful gradient effect by blending two or more colors seamlessly from light to dark or vice versa. From soft pink fades and nude gradients to bold color transitions and glitter ombre tips, this style offers a chic and versatile manicure option. This guide explores popular ombre nail ideas and tips for achieving a flawless, modern look that fits any season or occasion.
Ombre nail design remains a timeless trend in the beauty world, admired for its soft transitions and versatile appeal. Nail professionals and style editors recommend ombre techniques for both subtle and bold looks—ranging from classic nude-to-white French fades to vibrant blends like pink-to-orange or lavender-to-blue. This style is especially popular for weddings, seasonal transitions, and fashion-forward events. Brands like OPI, Gelish, and Kiara Sky offer polish and dip systems that make ombre blending easier for professionals and DIY users alike. Seen on runways and red carpets, ombre nails are a favorite among celebrities and influencers for their elegant finish. Whether done at the best nail salon or with sponges and brushes at home, ombre nail designs are some of the best nail designs for anyone seeking sophistication with a modern twist.
Haven’t had any luck finding the perfect nail technician for your bi-weekly manicure? There’s no one that you can trust quite like yourself! Even with no prior nail art experience, paint your own ombre nail design with ease to achieve picture-perfect manicures all fall and winter long. Need some inspiration? Explore this ombre nail design idea to elevate your DIY manicures to the next level!
As we welcome cooler temperatures, it’s time to swap out your swimsuits for sweaters and put away those flip-flops for a while. But what exactly does this mean for your nails? It can be a challenge to find nail art that suits what you’re wearing in the chillier months, but we’re here to put some gorgeous manicure inspiration in your life. Upgrade your nail game with a versatile ombre nail design look that you could realistically apply from the comfort of your own home. Whether you’re searching for a classic nail design idea or experimenting with trendy ombre nail design, there’s something for everyone to try out this season.
What is our Ombre Nail Design Idea?
These nails transition from one color to another, giving your manicure a beautiful gradient look. You can use any colors you like for these nails, but we recommend picking two to three shades that complement each other nicely.

The best part about the ombre nail trend? It’s so easy to do! All you need is a makeup sponge and an opaque top coat (we recommend Sally Hansen Triple Strong Nail Strengthener). If you want to get creative and add some beautiful sparkle, add some embellishments like glitter or rhinestones on the tips of your fingers for an extra special touch!
They’re a great way to show off your creativity and add some color to your outfit! Here’s a list of everything you’ll need to bring these Instagrammable ombre styles to life:
- Basecoat
- Three nail polish colors, ideally light, medium, and dark shades
- Topcoat
- Makeup sponge (we recommend wedge-shaped)
- Scissors
- Nail polish remover (because everyone makes mistakes!)
- A cotton swab or cotton ball
- Nail file (just in case for rough edges and nail shape)
- Optional: nail glitter or other accessories
How to Apply Ombre Nail Design
Follow these easy steps to achieve ombre nails at home
Step 1
The best nail polish application is first to apply a clear base coat, followed by your color of choice. Make sure you wait for it to dry completely before continuing the process. Attempting this technique on semi-wet nails will leave you with a big mess on your hands! Use a hairdryer to speed up this step if need be.
Step 2
While you’re waiting for your base coat to finish, choose three different polish colors. They don’t have to be from the same color family but opt for light to dark shades that create a natural gradient.
Step 3
Use your scissors and trim the flat end of your makeup sponge to mimic the size and shape of your nails.
Step 4
Apply the lightest shade in a thick horizontal line across the top of the sponge, followed by the medium shade in the middle and the darkest shade on the bottom. Feel free to rearrange the color order to create your desired effect. Tip: When applying the different polish colors to your sponge, ensure they overlap to avoid unwanted gaps.
Step 5
Line the polish-filled sponge up with your nail and gently dab it until you achieve your aspired outcome. It might take you a couple of layers before you get the gradient you love.
Step 6
Finish with a strengthening top coat to keep your mani looking fresh for longer. Add glitter or accessories as you see fit.
Fall Colors for Seasonal Ombre Nail Designs
This season, saturated jewel tones are in! Think about ruby red, sapphire blue, emerald green, and amethyst purple when brainstorming the darkest shade in your color palette. This look works best when you stick to the same color family. Beauty experts suggest painting your nails with a base color coat of white or beige to make your subsequent shades more vibrant.
Neutral tones are always a safe bet once the temperature drops. The ombre trend works incredibly well with creams, pinks, browns, tans, and taupes, too.
line includes twelve shades named after each month of the year. Their September, October, November, and December shades definitely understood the assignment, with bright, bold hues to base your DIY ombre manicure around.
OPI prides itself on supplying the market with premier nail polish, nail care, and nail art. The twelve shades in its most recent line do not disappoint! Browse through the collection here to get inspiration for your next nail look. We especially love the pops of color we see in OPI’s , , , and options.
Pair one of the darker shades below with two lighter tones from the same color family to achieve your perfect gradient. If you want to try something different, experiment with metallic, pearl, or even matte finishes to elevate this look. You can even accessorize your manicure with nail glitter, embellishments, and other cute add-ons you can attach with glue.
Tips and Tricks for a Successful At-Home Manicure

Patience is vital when doing a task as tedious as painting your fingertips! Don’t be too afraid to make mistakes while you’re figuring out the technique. To best prepare for any minor incidents, have some cotton balls and nail polish remover on standby. Zoya’s Remove Plus 3-in-1 Nail Polish Remover is one of our favorites because it not only erases worn polish but preps and conditions your nails for your upcoming coat!

If you’re really looking to amp up your DIY manicure, invest in a cuticle treatment to keep your hands looking like you just walked out of the salon. Try Olive and June’s award-winning Cuticle Serum for added hydration with a convenient foam applicator.
We’re also obsessed with another Olive and June essential—the Clean-Up Brush! Don’t worry about coloring outside of the lines when this petite brush cleans away excess polish and creates crisp lines in seconds.
We know we told you how important patience is when polishing your nails, but sometimes that patience runs out faster than you’d think. not only helps your nails dry more quickly but has a chip-resistant protective shield that will keep your manicure glistening for over a week.
Conclusion
Get rid of boring nails! Ombre nails are the hottest trend for the fall and winter seasons. We’ve spelled out all of the supplies that you need to complete this adorable nail look all on your own. Whether it’s a mani-pedi or just a basic manicure, we can help you create an ombré design that will match any outfit. Christmas is also not that far away… get so inspo for the most jolly seasons of all! So what are you waiting for? Get inspired by some of our favorite colors, and start painting today!
You’ll be giving everyone around you major #nailgoals envy all autumn long after trying this technique for yourself.
Prime Day Deals 2025: Best Beauty, Tech & Home Discounts
Get ready, because Prime Day…
Mullet Haircut for Girls | 2026
Easy hairstyles are trending more…
Pixie Cut Hairstyle | 2026
Easy hairstyles like the pixie…
30 Quick and Easy Hairstyles for Women
Quick and easy hairstyles for…
What exactly do ombre nail design mean?
A gradation of colors is formed in an ombré manicure, much like it is in ombré hair. The top of the nail starts off bright and gradually turns darker as it approaches the tip.
Is ombre nail design gel or dip?
Gel, gel paint, classic lacquer, or dip acrylics can be used to create ombre nails.
Do ombre nail designs last longer?
What is the lifespan of ombre nails? Well, it depends on the finish you select and how strong your nails are. They should last a week or two if you’re using regular polish. For two to three weeks, gel paint will last longer, and acrylic or dip nails will last even longer (around three to four weeks).
Stephanie Mansour is a nationally recognized Health & Fitness Expert as seen on Today Show, Dr. Oz, CNN, FOX New York, ABC Chicago, Fox LA, WGN, Fox Chicago, CBS Chicago, NBC Chicago, PBS, Yahoo, Sirius XM, Chicago Tribune and Crain’s Business. She reaches more than 52 million viewers per month. For the past decade, Stephanie has been helping millions of people “Step It Up,” every day in their lives with weight loss tips, lifestyle hacks, and fitness secrets to up their game. Steph coaches you on how to be the rockstar of your own health that you always knew you could be. She gets real and fast results and provides easy tips and tricks that work no matter how busy you are. She’ll help you finally rid yourself of the weight – both emotionally and physically – to get the life you want. In fact, she coached one reality TV star to lose almost 90 lbs in 3 months!
- Stephanie Mansour
- Stephanie Mansour
- Stephanie Mansour


